Automate send email of report generated as excel attachment with sharepoint in Dynamics 365 CRM
Send Automated Reports to Each User with customized excel template as Attachment
Dynamics 365 is a exceptionally amazing framework which enables Sales, Field Service, Customer Service and Marketing teams to perform huge number of functions to facilitate the business. Dynamics 365 has introduced new feature to schedule an automated report via "Run Report" wizard on each entity. But still there are few limitations. To overcome, all these limitations we need to setup the custom solution.
In this blog, we will demonstrate you the customize way to automatically send report as email with excel attachment. Here are few features which will be included,
- We can schedule a flow as per our need i.e. weekly, monthly, daily etc.
- Send Excel Attachment with Custom Excel Template
- Send email to Each user as per their access to records - we will only send the records in sheet where the specific user has access.
- Store specific template files in SharePoint for future reference.
Now, using an Power Automated flow, Excel Processing & SharePoint integration we can implement these features. The idea is to make a template excel file that will be stored on SharePoint. Inside the template file, we will create a table that will be used by the action to add dynamics rows. We then duplicate that file in SharePoint and fill it with the required data/information.
Step 1:
Lets start with the flow - create recurrence flow, set it to 1st of every month.
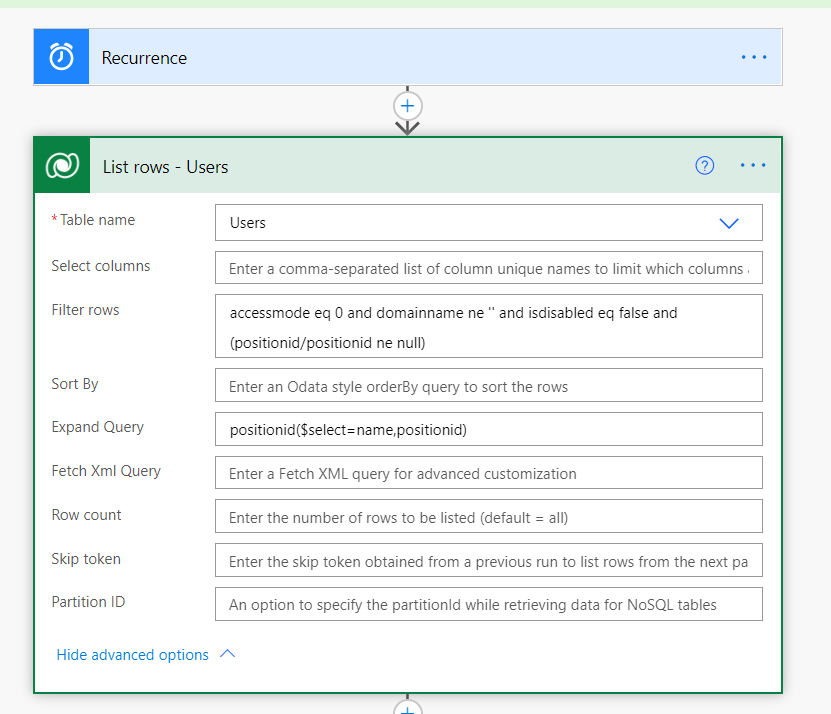
Next will get the list of enabled users with same business unit.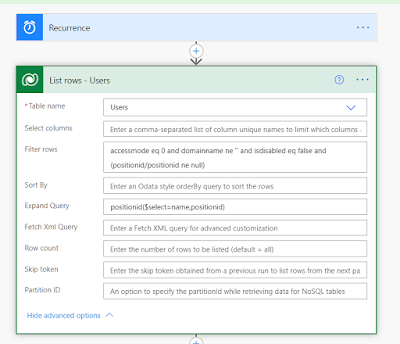


Step 2:
SharePoint Integration.
- Load the content of our template file
- Load Event Name
- Create a file in SharePoint with the content of the template file
- Get the graphId of the created file
- Load all Event Registrations
- For every Event Registration:
- Compose the row to add
- Add a row to the table
- Get the content of the file
- Send an email with the file as an attachment
Lets create a template file first, for now I will add only 3-4 columns but we can add as many required.

We will now upload the file to the SharePoint site. As you can see, we have created a folder “RichaTemp” within the root folder. Here we can find a “Output” folder which will hold the files that the flow is creating. And also uploaded our template file to "RichaTemp" folder.

Step 3:
Load Template File
For the further use lets define 2 variable, Driver Id & Folder Path
Next, we will get the content for template file that we created.

Step 4:
Create File
Now, we apply for loop for each user & create a new file for each user in the list fetched above. We create the new file from the template file that we uploaded & store it into the folder.

Now, it will create new file & then set the value of newly create file path into variable.
Step 5:
Get Graph Id
To get the graphID of the created file we have to send an HTTP request to SharePoint. To do so we use the “Send an HTTP request to SharePoint” action of the SharePoint connector.
This is the main part of the flow, most of the times people are not aware of this steps and that why they can not complete the implementation. To, add rows into dynamically created file graphID is required.

Step 6:
Logical Step to Get Real Information
Now, we will get our real information/data that we need to fill up into the excel file. So, here I will fetch the account list where the particular user is owner.
By applying this owner filter, we will create an excel sheet as per the users access. So, they are able to see only their records.
In this step, we can apply other logic as per our need, if we want to send hierarchical data then also we can setup a logic related to it.

Step 7:
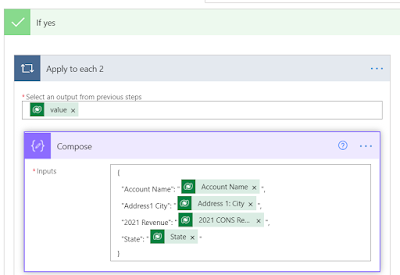
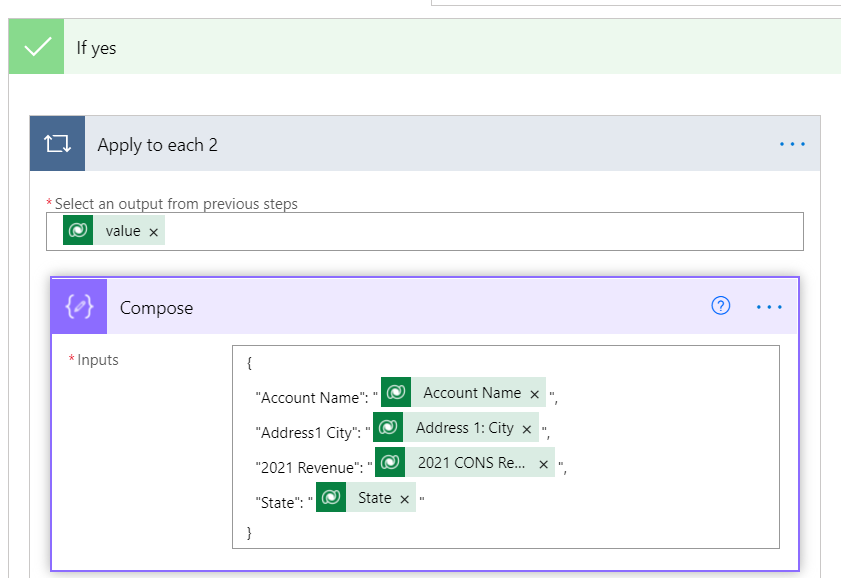
Compose row : This step should be within the loop.
Next, first we will check the condition that account list's length is grater than 0. If condition will satisfy then will add step into look to compose the row.
To add a row dynamically to an excel file we have to compose the row in Json format. For that, we use the build in “Compose” action.
The Input of this action is a JSON object that represents a row of our Excel. Every Column should be present and referenced by the name we typed in the Template.
"<Column Name>":"<value>"
Step 8:
Add row to Excel
To add our composed row to the table we use the “Add a row into a table” action of the Excel Online (Business) connector.
This step is the heart of our flow. So, lets see how we will set the value for each parameter of step.
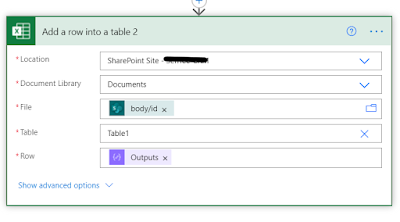

Location: We the same SharePoint site we used to create the file in.
Document Library: We have to choose the correct Document Library. Usually we only have one option, “Documents”.
File: Since we are handling a file that will be created dynamically we can not choose the file from the file selector. We have to provide the graphId of our temporary file.
outputs('Get_GraphId_of_temp_file')?['body/id']
Table: Here we choose "Enter custom value" and write the name of our table we created in the Template. For this demo it is "Table1"
Row: This should be the output of our previous compose step.
Step 9:
Add Delay & Then Load the content of new file.
After the loop of account list, add delay of 2mins. As the step add row into file working async we need
wait for bit time to make sure that all rows are added completely to the file.
After delay, To be able to send the file as email attachment,
we will add step to load content of created file.
we will add step to load content of created file.

Step 10:
Send Email
The last step is to send an email with the file attached. Here you could use whatever email connector you would like to (for example google). For this demo, we will use the “Send an email (V2)” action of the Office 365 Outlook connector.

Congratulations!
We have effectively completed the weekly report via SharePoint connection & Excel Processing. So, you can see solution is not that much complicated if we have proper knowledge of what we are looking for and how to implement it.
Power Automate provides a wide range of area to work and to make our process simpler. Using an power automate we can integrate many platform on the same common layer. As we seen that we worked with Dynamics 365, SharePoint and Excel Processing on a single layer.
I hope this article helped you. Please don't hesitate to contact us if you have any query or concern. We glad to help.
Comments
Post a Comment